Sunday, May 18, 2014

Gardening e-books

While I waited to plant my little seedlings these past few weeks, I perused several gardening books that I got online for my Kindle Fire.  There are quite a selection of e-books available on various aspects of gardening. Some I downloaded were good, some not so good.  Fortunately for me, I got them all on days when each was offered for free, and so I spent nothing for the information that I gained, as well as spending nothing on those that were a bust. Here are some of the ones I decided were "keepers:"


SOME GARDENING BOOKS I RECOMMEND :

A really well-written book of four pamphlets with loads 
of information and innovative ideas.  How about growing
potatoes in a 30 gallon Rubbermaid garbage can on your 
deck or balcony?!

This book is a great introduction to composting and 
raised beds.

A good book that will convince you of the value
of raised beds.  It doesn't actually show you how
to build them, however.

This short book gives some good info on these 
particular vegetables which are ones I will be
planting quite aggressively.

A really good book that gives great ideas for 
gardening in almost any situation, and especially
for urban dwellers.  It proves you can garden just
about anywhere.  I really liked that!

I have these gardening books (and more!) on my Kindle Fire HD as well as on my desktop computer and an old laptop. The Kindle makes them portable, of course, but when I want to share the photos or I want to show my son, Ben, (who might be helping me with some aspect of a project) what I am talking about, then I pull up the book on my computer.  That way it is easier to see and share.  I can also pull it up on the laptop for a large display that can be carried outside, if necessary.  Sometimes I really like technology .... a lot!

I have been composting now for several years.  My two bins are just old plastic 30 gallon garbage cans with lids that I alternate from season to season.  The way I do it, one bin is ready to use every 6 months or so.  I use my compost in addition to the llama beans I mentioned last post.  This combination of added material to my garden beds insures plenty of nutrients that break down quickly to create a rich growing medium for plants and seeds, and surprisingly fewer weeds to pull.

Here are my two bins made from old Rubbermaid
30 gallon garbage cans.  The lids lock on to deter
any curious creatures from checking out the contents.

We drilled holes all around the upper and base of the
bins in order to promote good air circulation for faster
decomposition of the contents.

This bin is in the last stages of  decomposition.  I have added a final
layer of "brown" ingredients to the last layer of "green" ingredients....
several inches of dirt and leaves that piled up on my driveway through
the winter and early spring months.

The other bin is in the early stages of composting with a "brown" layer 
of leaves and soil from the driveway on the very bottom and a "green" 
layer being build on top.... discarded produce pieces in this case.

I keep a bucket under the kitchen sink where I collect items to add to the compost bin each week.  I put my coffee grounds, eggshells, raw vegetable cuttings, onion skins, orange and banana peels, small pieces of cardboard, and the like.  You will be surprised at how quickly these things can add up, as well as how quickly they become usable in your garden!  Just remember that you do not want to include anything like meat, fat, grease, kitty litter or animal droppings, as this will make your compost smell or even die!  You don't want that, do you?!

This weekend was spent enjoying seeing the early rewards of all my hard work in the garden the past few weeks.  I am really pleased!  The okra and cucumbers are up and growing quickly, as is the squash.  You can almost watch them grow if you stay long enough among them!  The tomatoes are beginning to bloom (there is even a little tomato on one of the Marglobes!) and it is about time to harvest the rest of the winter crop of Swiss chard in order to make room for the spring crop of plants growing in its range.  I hesitate in doing this because they are still doing so well, and their colors of red and green and purple are so lovely in the garden right now!  But soon the heat of the season will make them wilt and I will have to steel myself to pull them, roots and all, out of the earth. I love the sound and feel of pulling weeds out of the ground, but these are my babies!

This weekend I planted the rest of the containers for the cotton and put them way out front away from the variety I planted in the main garden.  This last batch of seeds was from white cotton that seemed to have a yellowish cast to it compared to the rest of the white.  I planted the darkest and bluest green cotton seeds in the main garden.  I also gave some brown cotton seeds to a friend to plant in her garden.  Wanda's seeds were some of the Sea Island Brown cotton that had more of a reddish cast than the rest of my crop from last year.  I can't wait to see what happens with these variations of the originals I had planted.  I enjoy a good experiment!

Meanwhile, I am trying really hard not to be tempted to buy any perennials, rose bushes, or petunias when I visit the garden department at Lowe's.  Naturally I want to concentrate my efforts and finances this year on the veggie beds and saving up to build my greenhouse by summer's end.

And so I am really enjoying the blossoms on my "butterfly rose" bush (Mutabilis) and soon my chaste bush/trees will present their purple blue spires for me, the bees and butterflies to enjoy.

The flowers of the butterfly rose start off as orange buds
then open to five yellow petals which change the next day
to pink and finally to magenta!  All four colors appear on 
the bush at the same time, making it quite a magical sight!


UPDATE ON NEW BIRD IN THE YARD

The greenish yellow bird I saw last week in my front yard was not the yellow-throated vireo that I thought it was. After a bit more research and sightings of the male that accompanied it, I now have identified it as a female orchard oriole.  For several years I have seen a male of this species in my back pastures singing his heart out at the top of the trees, but I don't recall noticing the female, even though I knew that she must be out there.  I do recall seeing a yellowish green bird fleetingly at times, but it was not enough to be able to identify it. This time, last week's sighting, was in the front yard close enough to really see the female as it perched on a bare branch of the crepe myrtles in between making acrobatic swoops for insects. Several times during this past week, I saw a male orchard oriole out in the front yard at the same time, and I put two and two together, along with some online research, where I was even able to hear the music of this happy songster.

Orchard Oriole Photo
Male Orchard Oriole

You can go to this site online and read all about them and even hear recordings of the glorious songs that I enjoy in my back, and now front, yard!   http://www.allaboutbirds.org/guide/orchard_oriole/sounds

Finally, on Saturday Ben and I discovered some baby cottontails on an adventure in some high grass in our front yard.  (The front yard has been a very busy place lately!)  They were quite a ways from the two brier patches.  We grabbed them and put them back (hopefully in the right one) and hope that Mrs. Cottontail found her naughty babies soon afterwards.

Baby cottontail bunny


Entrance to the brier patch where we deposited the little bunnies.


Well, I guess that is all for now from HeartSong Farm.  Next week we'll be shearing the llamas.


Sunday, May 11, 2014

In and out of my garden

I hope that you and/or the mothers in your life have celebrated a wonderful day today, as I have.  Gifts and long phone calls, less humid weather with a nice breeze, clothes freshly washed and hung on the line, and several hours spent puttering in my new garden.


The last three weekends I have been quite busy outside in my vegetable garden, and I believe I have finally finished getting it in shape and completely planted, except for some of the white cotton seeds that will go in large pots out front away from the dark green that I planted in with the veggies.  After all this hard work, I can say that I am tired, but very happy about the results!

IN THE GARDEN
The patty pan (button) squash planted in one of the raised
bed containers after the black mulch cover was removed.

I must give an update on my findings with the use of the Patio Pickers Raised Garden Kit system that I reviewed a couple of posts ago (click here to view).  I kept noticing that quite a few of the squash plants in each of the three containers were wilting and looking quite sad.  Eventually, some had to be pulled.  Then yesterday I decided that maybe it had something to do with the black plastic mulch cover, because the potting soil around the plants seemed to be wet, not moist.  Maybe it was holding too much moisture in and causing the plants to literally "drown?!"  So, yesterday I removed the covers on each, and this morning and throughout the day as I checked on them, the little squash plants seemed to be recovering their strength.  In fact, I noticed several blooms on the zucchini this afternoon on my last jaunt through my garden.  I am encouraged.

I turned this old, unused Rubbermaid water trough into a raised 

bed for the muskmelons.

One of quite a few eggplants I am growing in containers this year.

Icicle radishes looking good in an old plastic window box, 

complete with a lizard!

And the "corn salad" is also doing well in a matching window box.

Tomatoes, marigolds and basil all in rows!  Okra and cucumbers are 

sprouting in the rows beyond, and soon the green cotton I planted today. 
One of my two old raised beds.

The other old raised bed.  This one has the winter crop of chard, garlic,

the Brussels sprout, rosemary and oregano .... with the new plantings of
marigold, cilantro, basil, frying peppers, pimento, lemon cucumbers, 
parsnips, and salsify.  

The parsnips are on the left and the salsify on the left.  I plan to plant

 more in mid to late summer.

Common Basil

Purple Leaf Basil, very similar to the common variety only with

lovely purple leaves.

Greek Basil, leaves a bit firmer and pointed.

Thai Basil, which has tiny pointed leaves and purple

flower spikes that remind me of salvia.  The fragrance 
is deliciously peppery!

Here is the "front garden" which consists of the original two raised beds and the bed with the fava beans of 

the winter garden.

And here is the new "back garden" which, up until two weeks ago, was Jagger's pasture.  Now it contains one raised bed up against the fence for the asparagus beans and new crop of chard, as well as a number of containers planted with the melons, more squash, and the eggplants.  Today, I planted some of the seeds for the dark bluish green cotton seeds at the left end of the raised bed.

OUT OF THE GARDEN
During the week, I noticed a new hawk on the telephone poles along the highway I travel regularly, to and from town.  I have come to believe that it is a broad winged hawk.  My first sighting was one afternoon, as I drove up to my mailbox on the south side of the highway, and a hawk was across the road and down just a bit.  I carefully walked step by step along the paved shoulder until I was directly across from it and took mental notes of the markings.  It was not one of my red-shouldered hawks as I had first thought!  It's head and beak were different (I'd say smaller), and there was no red on the shoulders, just shades of brown and golden brown.

It let me observe it for about 10 minutes, then one of those gargantuan chicken trucks passed by and the hawk flew to another pole down the road.  In flight, I could see the tail feathers, black and white banded, and once I was inside, I grabbed my Peterson's Field Guide and decided it was a broad winged hawk that I had seen. For a hawk lover like me, this was quite an exciting event! I have since seen it one other time, in the morning on a pole not far from its position on my first sighting.  

As I have reported before, there are two red shouldered hawks that have returned to the area of my farm for several years now.  I have christened them Token and Charm.  (What?! Why of course, I named them! They are magnificent!)  There is also a pair of red tailed hawks that I have been following for almost 8 years that I have named Aegis and Aurora.  Their territory is about one and half miles from the outskirts of town, about two and half miles to the west of the farm, and I see them quite frequently on my way to and from work, either perched atop a pole or hovering and diving for a catch.

If this new hawk stays around and then returns next year, it will earn a name as well!  Any ideas?!

I was happy to see that several scissor-tail flycatchers have recently returned for the summer here in my small part of the world.  I really enjoy watching their ballet-like movements in the air as they select their mates, and, later in the summer, as they spot insects high above the open areas of my pastures. Truly an amazing site to behold!

And, yesterday afternoon I caught sight of a very new feathered visitor to HeartSong Farm, and a quick look at my field guide confirmed my first impression that it was either a warbler or vireo of some kind. I am 95% positive that it is a vireo of the yellow-throated persuasion.  A few more sightings and I should be able to confirm this.  I know that I have heard a distinct new song in the front yard the past week, so hopefully we have a new resident among us!

AND FINALLY.....


In the afternoon, Godfrey confiscated the box that held my Mothers Day gifts.

And that is how it went this week on HeartSong Farm!

Sunday, May 4, 2014

The veggies are in the ground!


This post took a bit longer than usual because I have been out and about in my garden and yard instead of at my keyboard.  I am feeling so fulfilled this week, and also mighty tired!  My Spring Garden is looking pretty fabulous if you ask me.  It is not quite finished, and I still have some winter crops in the ground (fava beans and Swiss Chard), but my beds have been refurbished with new soil, compost, and llama "beans", and I have expanded my growing space quite nicely with comparatively little effort.

Llama "beans"

Llama "beans", you say!?!  Yes, llama "beans."  Also called llama poop, but we llama aficionados prefer to call them "beans" because that is what they look like... blackish brown and about the size of a large bean.... and these "beans" make really excellent fertilizer!  Unlike cow manure or chicken manure, llama "beans" do not smell nor do they need to be aged, and they will not burn your seedlings or plants.  They can be used almost immediately on your flower and vegetable gardens as you would dry fertilizer (it is best to wait 24 hours after "manufacture."). Or put some in a container, add some water, and you have "Llama Bean Tea" for watering your plants!  Pretty awesome.  If you have llamas in your pasture, they just keep making more, so you always have a nice supply. But if you don't have llamas (or alpacas), see if you can locate one nearby and ask for some to try on your veggies, fruit, lawn and flowers.  You will be pleasantly surprised, I think!

One thing that I find myself dealing with once again, but this time in my gardening, is my inability to make decisions readily. What to plant?!  Where to plant it?!  When to plant it?!  What should I plant it next to and how many should I plant?!  ARGHH!  Sometimes I think I am getting better at making decisions, but then I find myself outside among my garden beds just staring at them and wondering what, which and when!

But decisions have been made at last, and what have I planted in my Spring Veggie Garden, you ask?!  Well, ...... there's:

   SLICING TOMATOES and  CHERRY TOMATOES

I have decided that next year I need to plant the tomatoes in larger peat pots than the ones I used this year. They really need to be able to get to be larger plants before I set them out, and I need to start them in my little greenhouses much sooner, also.  I have lost a few to cutworms already, before I remembered to dust them with some Sevin dust and surround them with tin cans.  Cutworms really like tiny tomato seedlings!

   PIMENTO PEPPERS (from seeds I saved from last year's crop) and FRYING PEPPERS (small red and yellow and orange peppers good for sauteing)

   YELLOW STRAIGHT NECK SQUASH, ZUCCHINI, * ACORN SQUASH, * PATTY PAN SQUASH, * SPAGHETTI SQUASH+, and * DELICATA SQUASH+.

Golden Bush Scallop SQUASH, SUMMER 3 g
Patty Pan or Button Squash


Spaghetti Squash

I have been finding some really interesting recipes for spaghetti squash.  I have always been a bit intimidated by this vegetable.  I found it too expensive in the grocery store for experimentation (what if I didn't like it?), and I figured that it probably took a lot of preparation that I was not sure I wanted to invest time in.  So I have ignored it until now, when a good friend gave me some seeds this Spring and told me how wonderful it is.  I am really looking forward to trying it!  Have any of you tried it?


Delicata Zeppelin SQUASH, WINTER 2 g
Delicata Squash

* MUSKMELON (aka cantaloupe)

* MYSTERY MELON+ (Yes, that is what it is named! A sort of cross between a cantaloupe and honey-dew melon with a bit of watermelon thrown in for good measure?!)

* MALABAR SPINACH+ (a vining plant that has leaves that are like spinach and can grow in the heat, unlike spinach)

Red Stem Malabar Spinach Seeds
Malabar Spinach

   RADISHES (White Icicle)

* "CORN SALAD" (a mixture of lettuces that my friend shared with me)

* SALSIFY+ (a root vegetable with a taste like mushrooms and oysters?!  I am so totally intrigued!)

Salsify

* PARSNIPS+

Parsnip, Hollow Crown
Parsnips

* ASPARAGUS BEANS+ (really, really long beans with a unique flavor)

Asparagus Beans
   CUCUMBERS (slicing)

* LEMON CUCUMBERS+ (tennis ball size cukes that you can eat like a fruit ...  seeds given to me by a friend who says they are "yummy")

Lemon Cucumbers

* WATERMELON (Moon and Stars)

Amish Moon And Stars WATERMELON 3 g
Moon and Stars Watermelon
I got the seeds for this special watermelon in the "goody bag" given to us at the final Wildflower Retreat....sigh! I can't wait to have a chance to remember that retreat with a slice of ice cold watermelon this summer!  I will save some seeds to plant each year from now on.  The memories of that final retreat will live on and on!  Only one seed sprouted, tho .... so I am keeping my green thumbs crossed that it will survive and produce.

* ONIONS (ones that I have grown from store-bought onion bottoms)

   GARLIC (planted last fall from cloves of store-bought garlic)

   EGGPLANT (Ichiban, my favorite for stir frying or roasting)

   SWISS CHARD ("Lucullus," which is one that can withstand heat better than the winter one that I planted and enjoyed, but chard is really a cool weather crop.

   OKRA (Clemson Spineless, from seeds I saved from my 2013 crop)

   HERBS:  Rosemary, Oregano, Cilantro and the all important Basil. I couldn't live without basil, for the fragrance and the taste!  This year I planted 4 types:  Basil, Purple Basil, Thai Basil, and Greek Basil.  The Thai Basil smells peppery!  I will take photos of all four kinds for a later post.  Promise!

AND

the * Fava beans+, *Swiss chard, and *Brussel sprouts (left over from my Winter Garden)

The * indicates those I have never grown before, and + beside them means I have never even eaten them, but I want to try them!

Fava Beans

The fava beans finally started making some bean pods this week.  I hope to be enjoying them soon, but it is like waiting for chickens to grow teeth!  I think the strange weather has really upset their normal growth pattern. Meanwhile, I still see my little green lizard friend enjoying his/her guard duty against bugs high up in the bean stalks!

My Brussel Sprouts plant in the garden

I love Brussel sprouts and I bought this plant last Spring as a seedling at the feed store.  I am not sure when it will be ready to harvest, but it has made leaves and stalks and I can see what looks to be tiny sprouts along the stem of one stalk.  No wonder the darn things are so expensive in the grocery .... seems they take forever to be ready to eat!

Teensy tiny Brussel Sprouts on the stem!

So, a pretty ambitious garden, wouldn't you say?!  Well, I am hoping to save substantially on my grocery bills, and maybe even my medical bills with this year's crop.  I will be eating healthier this way, and working in a garden is a great way to be active, fuel your soul, and cut down on stress in your life.  But I have never had this large of a garden, or this many types of vegetables.  I am excited about new tastes and textures, and I am already finding some interesting recipes online that will put my produce to good use.  Got any recipes for me?  Please share! I plan to start a recipe page on my blog to feature them and those I find myself.

Speaking of being ambitious with a vegetable garden, my Daddy is probably the King of Garden Ambition.  When he retired from corporate work in Corpus Christi and Houston, where he had spent the last ten or so years living in apartments, he couldn't wait to move rural and have a "Big Garden."  So my parents moved to a small town in East Texas on about 2 acres, and Daddy planted a HUGE garden the very first year... including 70 tomato plants!  For two people!  There were also cucumbers, peppers, yellow squash and zucchini, and to this day I can still hear my mother say to him: "Edwin, if you bring one more zucchini or cucumber into this house I am going to beat you with it!" Strangely, the weather was unusual that first summer in the country. Seems Daddy's huge garden was the only one whose tomato plants produced in that area so he had no trouble giving away a large percentage of his proudly produced produce!

Now, back to the present.  Some of my winter crops didn't suit my fancy, after all.  At least not as far as how the ones I grew turned out when I cooked them.  I was quite disappointed with my turnips and beets as they did not taste like I wanted them to taste.  The greens were delicious for both, but not the tubers themselves.

Kolrabi bulb harvested in April

I was also not impressed with the taste or development of the kohlrabi, a vegetable popular in Europe and a food reportedly full of great benefits to our health.  I think that most likely I need to do some research on the cultivation of these three vegetables.  Maybe my soil was too heavy or not the right pH, or maybe I planted them too close to each other, or didn't keep the soil moist enough during the developmental stage of the roots.  Right now, I am not leaning toward planting them again anytime soon.  I have decided that when I want beets, I will grab me a can off the grocery store shelf, or check out the price of the ones in the produce aisle.  I just love Harvard Beets and Pickled Beets!

Now ... remember the Lady Banks roses that grow on an arbor over my driveway side door? I had shared a photo of them taken back in late March and they looked like this:


And then two weeks ago, it turned into this almost overnight!  We have already had to trim it back a bit so we could get into the house without ducking our heads!  It is what inspired one of my early haiku poems.


Rose boughs ‘bove my door
What makes you so boisterous?
Have you had your say?

Rose boughs 'bove my door
Explode with dainty yellow.
Clearly you do speak!


We sure do enjoy writing haiku and digging in the dirt on HeartSong Farm!


Sunday, April 20, 2014

So ready to get my hands dirty!

On the second weekend in March, I planted most of my vegetable seeds in their little peat pots, gave them water, wished them well, and put them to bed in their little GroundWork's walk-up greenhouses out on my back porch.  A week later, most had sprouted and within 10 days all were soaking up the sunshine that was coming through the nice heavy-duty plastic that protected them from the cold on the other side.  (Remember those low temps?!)  And, I never had to water them except for the initial planting time because the plastic cover formed condensation throughout the 4 weeks the baby plants were undercover, and when I would stick my arm in there to turn them around, it was toasty warm in there!

greenhouse kit heartsongfarm.blogspot.com

inside greenhouse kit heartsongfarm.blogspot.com

greenhouse kit heartsongfarm.blogspot.com


I got the greenhouse units on sale for $25 at Tractor Supply (reg. price was $29) and Lowe's has some very similar to these, priced the same.  I was very pleasantly surprised at how well they were constructed  and how easy it was to put them together.  They have worked out very well for me.  When my real greenhouse is built, I will be able to use the shelves and pans in it, but for now I needed something portable to get my seeds started.  No more starting them on my kitchen counters, table tops, and atop my washer/dryer.  I am moving on up toward the Big Time, me!

Last weekend I was just dying to put those sweet little sprouts in their permanent places in my vegetable garden beds, but I was scared!  What if we had another frost? It could happen...it snowed on Easter this time last year here in my neck of the woods.... like Winter's last cosmic joke of the season. I just don't trust the weather these days and I already have trust issues on fronts other than the weather kind.  This year, April 15, 2014, was not only tax day, we had a frost.  What's next???  A blood moon?! Oh, wait, we got that, too!  Yikes!

But it is now Easter weekend, and I plan to get my hands dirty!  On Thursday morning before leaving for work, I unzipped the plastic door covering on the greenhouses, rolled them up neatly and held them in place with the nice Velcro at the top. This was to allow them to "harden" for a few days and nights before they go out into the scary real world with its rain, heat, sunshine, weeds, and BUGS!


Then on Friday I moved them into the full sunshine for part of the day, and again on Saturday.  They really liked it!

gardening heartsongfarm.blogspot.com


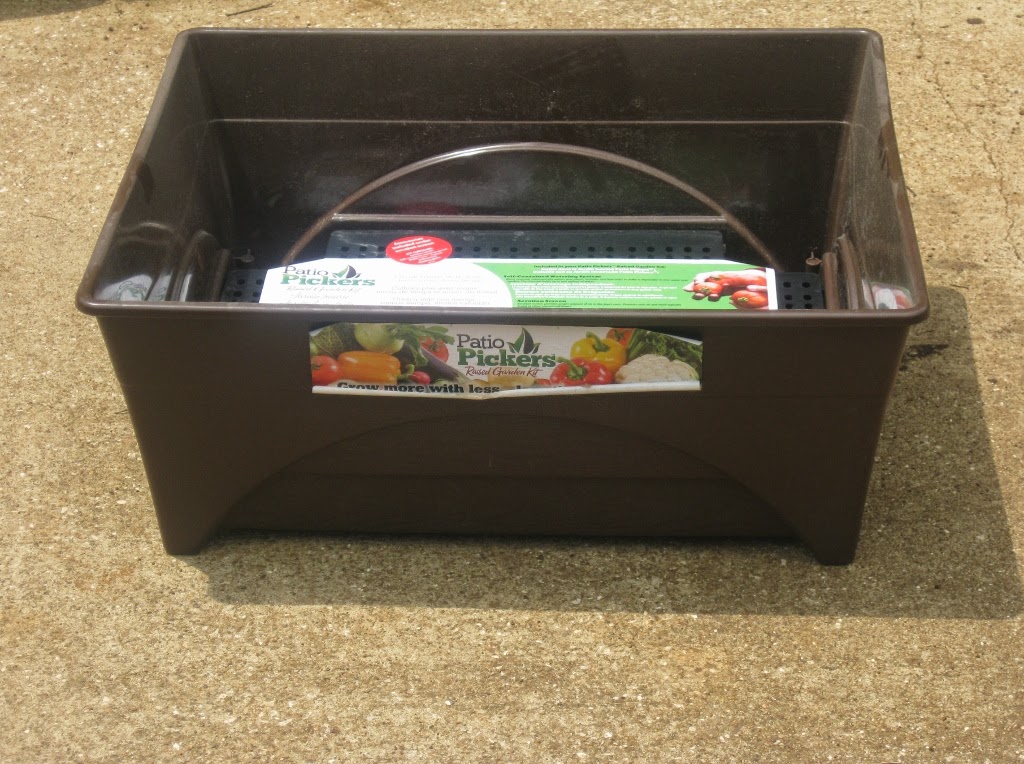
While I let the little plants harden, I started putting together another product that I am anxious to try out called Patio Pickers Raised Garden Kit.  It is a portable raised bed that is designed to help you do some "urban gardening" on your balcony or porch.  Now, I am not really doing any "urban gardening," but these nifty units looked like an inexpensive way for me to have raised  beds without all the fuss of building them this year.  I already have too much on my plate, as usual.  I saw them by chance at Lowe's while pricing plain, large plastic pots to plant my eggplant and squash in this year.  This product, at $29, was cheaper than two of those pots and could do more for me, so I bought 3.  They are actually kind of a cross between raised bed, hydroponic, and square foot gardening concepts, all of which I am a real fan.  How could I lose?!

urban gardening heartsongfarm.blogspot.com


urban gardening heartsongfarm.blogspot.com

The dimensions on them are about 20" x 24" x 9", and the instructions list how many plants of what types (both flower and vegetable and fruit) that you can plant in each.  I wanted to plant squash in mine and it indicated that I could plant 5 to 6 in one container.  The directions are very well done and installation is very simple. You will need to purchase 1.5 cubic feet of a good potting mix (not potting soil) that contains spagnum moss, which I found to equal 4 bags; a bag of dolomite or "garden lime" (but you need only a small amount, so buy the smallest bag you can find); and common dry granular fertilizer like you would put on your lawn, such as 13-13-13 (not time or slow release or any kind you mix with water).  There is an aeration screen, a water fill tube, and a mulch cover that are included.  They also came with 4 casters for the bottom so that, on a deck or patio or balcony, you can move them from place to place, but I didn't put them on as I was not going to be moving mine once I placed them.

urban gardening heartsongfarm.blogspot.com

Follow the directions carefully and, in no time, you will have a raised bed garden system that takes up a small amount of space, and does not waste water.  You add water as needed through the water fill tube, and with the mulch cover, what water you do use goes straight to the plants without evaporating! Also, I suspect that you will have less of a chance of powdery mildew and such, and, of course, no weeds to pull, which is my favorite part, I think!  Yay!  And you can plant just about any kind of vegetable you want in them, including peas and beans and okra!  Or how about some strawberries?!  (see update for this product here),

Now, I also wanted to share with you the way I am growing onions from regular store bought ones.  I figure that eventually I might have enough to never have to buy an onion at Kroger ever again!  Of course, I will also need a huge onion bed, because I LOVE cooking with onions.

propagating onions heartsongfarm.blogspot.com
First, you take a regular onion.  This one is a 

yellow onion that happens to have already started

sprouting out the top, but that is totally unnecessary.

propagating onions heartsongfarm.blogspot.com
Then you slice off about 1/2" of the bottom where the dried out roots

are, and you let it sit at least 24 hours to dry out on the cut side.  

I have waited up to a week to plant, but I think that it is best to plant
within 3 days.  You can plant in a pot on a windowsill if you like.

propagating onions heartsongfarm.blogspot.com
Make a depression in the soil, and plant them, inside or out, filling the

depression first with plenty of water and then press the slices into the 

wet soil.  You do not cover them with soil.  It is important to keep the
slices well watered.  Soon, you will see green tops sprouting!

propagating onions heartsongfarm.blogspot.com
When they look like these, the roots have re-hydrated and formed 

new ones and they are ready to take out of the soil and divide into

individual onion plants.

propagating onions heartsongfarm.blogspot.com
It is best to use a sharp knife and slice carefully between the green

tops, making sure there are some nice roots on each piece.  You are

then ready to plant these cuttings in your garden to grow into real
onions!  And you will have gotten at least two onions out of one!

propagating onions heartsongfarm.blogspot.com
You can do this with your shallots or green onions, also.

Here is a green onion I grew as an experiment over the last year.

It does take them a while to get big.  This one was in the garden 
since last summer, but it started out as a tiny green onion from 
Kroger for putting in my Fourth of July potato salad.  I sliced the
bottom off and planted it directly in my vegetable bed.  You could 
easily grow these on a pot in sunny window sill and have green 
onion tops all year long, and eventually a fresh onion!

I have read that you can grow celery in a similar fashion, and a friend has been able to do the same with some bok choy.  I am going to try the celery soon, maybe this week, and see what happens and will let you know how it works.  I love celery for its crunch and health benefits, but, let's face it, folks...why is it so expensive in the grocery when it is nothing but water and strings?!

This weekend I discovered that at the end of the fava bean row, right next to the little marker that says "SPINACH," there was a beet growing in the dirt under the leaves of what I had been cooking and eating as spinach during the winter!  Truth be told, the leaves didn't look like the spinach leaves in the grocery store, but I just thought it was a different variety.  The good news is that now I have even more beets to enjoy for a while!

My fava beans are blooming up a storm and have been since mid-March.  The seed packet indicated I would be harvesting them in March, but that was not the case, at least not for me, and not this crazy year! The pea flowers are so pretty....white with black spots!  Very stylish, if you ask me!  Both honey and bumble bees have been enjoying the flowers constantly.  But, after a month of blooming, there are still no signs of pods forming and I am wondering if it has to do with the weird temps.  I think it does, so now that the temps are rising as they should this time of year, I hope to be shelling some fava beans soon!

Now, some photos from the last of my winter garden.  

Swiss Chard heartsongfarm.blogspot.com
The Swiss Chard is so pretty with its greens and reds.  Very tasty
cooked similar to spinach.

fava beans heartsongfarm.blogspot.com
 fava beans heartsongfarm.blogspot.com
Here you can see just how much the honey bees love those sassy white flowers with black spots!


ladybug heartsongfarm.blogspot.com
Ladybugs are also a constant visitor to the fava bean plants.

green lizard heartsongfarm.blogspot.com
And I found this sweet green fellow hiding among the leaves

Well, it has turned out to be a very good weekend for gardening, after all, here on HeartSong Farm!